Install License Plate To Bracket
Mount your license plate on your car without drilling unsightly holes in the front of your bumper. Our bracket mounts securely to the underside of the bumper.
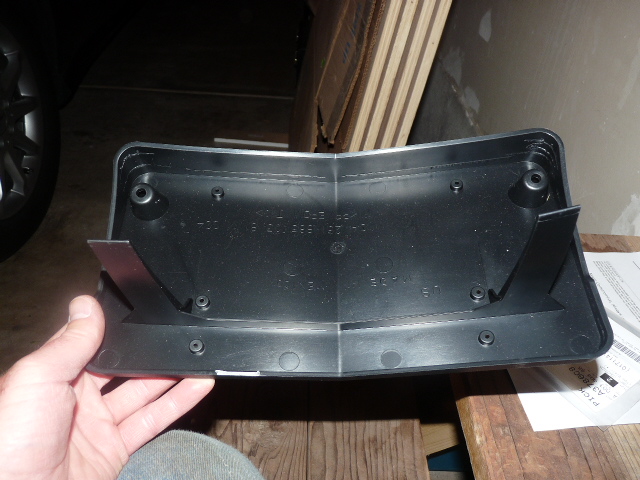
How do you install the Front License Plate Bracket? The dealership where I purchased my JRT didn't install the front license plate bracket - I mistakenly thought it would be simple thing to do myself after I received my new registration. My dealer is over 30 miles away. I'm still waiting for a rely to my email requesting instructions. I'm sure the local dealership will require me to make an appointment and will charge me to install it. Annoyingly, I found the package was torn open.
There wasn't an instruction sheet. The package contained the front license plate bracket, 8 short screws and a 'tool' that does not match the screwheads (The tool looks more like a spare tool to open the My Sky panels). I'm not sure if any parts/screws/bolts are missing. There are no markings on the bumper as to where the screws should go. I'm concerned that the screws are rather short. How To Create A Poi File For Tomtom. I'd prefer to put in longer bolts with a locking nut, but I'm worried about drilling into the bumper (What drill bit should I use - is the bumper just plastic or is there metal behind it?), and whether I'd be able to reach behind the bumper to attach the washers and nuts.
Is there any chance I'd set off the airbags when drilling into the bumper? Does anyone have any advice?
I looked at the Craven Speed device for the Trailhawk, but it bolts under the vehicle and the 'extension' defeats the angle of the Trailhawks 'approach angle front bumper' - I also suspect the if it hits something, it will be driven up and damage my Jeep. Self tapping screws just longer than the ones the dealer sent you.
My dealer used.25' self tappers, only 2, and I found out going through my 1st mud hole.left the bracket w/ license plate sitting in the middle of the hole barely sticking out to see. Saw it missing when I got home, went back and saw it shining out from the middle. I went to the local bolt supply and got some longer self tappers, and put 2 in the bottom along with the 2 in top. Used my small dewalt 12 volt max screwdriver. No big deal, just center it up, drill them in, bolt it up.
Self tapping screws just longer than the ones the dealer sent you. My dealer used.25' self tappers, only 2, and I found out going through my 1st mud hole.left the bracket w/ license plate sitting in the middle of the hole barely sticking out to see. Saw it missing when I got home, went back and saw it shining out from the middle. I went to the local bolt supply and got some longer self tappers, and put 2 in the bottom along with the 2 in top.
Used my small dewalt 12 volt max screwdriver. No big deal, just center it up, drill them in, bolt it up. Any idea as to whether you went through just the plastic of the bumper or through the material (metal) underneath it (can you feel the tip of the screw from behind the bumper)? ATTACHING THE FRONT LICENSE PLATE HOLDER/BRACKET ON A JEEP RENEGADE TRAILHAWK (2016) WITH EXTRA HEAVY DUTY BLACK WIRE TIES I got my registration documents today (I retained my plates) so it was time to put the sticker in the window and put on the front & rear license plates. I'm just not ready, without more info, to put a drill to my new Jeep Renegade Trailhawk. So here's what I did - the final result is pretty 'clean' (note due to my bad knees, I took the easy way out an put the 'zips' at the top of the the license plate frame - eventually, I'll probably replace the original zip ties and put the 'zips' on the bottom): Center the license plate bracket/holder on the center of the bumper. Find the 'space' in the lower grill where the 'tube' extending from the license plate holder/bracket goes.
Thread 2 (for redundancy) extra heavy duty black wire ties (Lowe's) from behind the top of the bumper on each side of the 'post' in the grill (just reach under the bumper and you'll find them as you are feeding them from above). Pass them through the grill 'space', through the 'tube' in the license plate holder/bracket, run them across the face of the license plate holder/bracket to the bottom (or top) edge of the license plate holder/bracket and then tighten them down with the 'zip' at either the bottom edge (or top edge) of the license plate holder/bracket. Use the supplied screws to fasten your license plate to the license plate holder/bracket over the wire ties (which when tightened will remain flat across the face of the license plate holder/bracket. Cut off the excess wire tie (Trim it almost to the 'zip' with a wire cutter or scissors, then I use an old toe nail clipper - as it makes a nice clean cut.) Note that I also installed a WeatherTech Bumper Frame also. The good thing about this method is that when I am ready to drill into the bumper - the license plate holder/bracket is already in the perfect position to drill and insert a bolt and lock nut without having to use another hand or tape or whatever to hold the license plate holder/bracket in place. A little trickier would be to fasten the license plate to the license plate holder/bracket (and the Weather Tech Bumper Frame) with bolds and lock nuts) and then try to feed the wire ties behind the plate before 'zipping' them --- A project for another day. Drilling is not required.
Someone posted here somewhere about a license plate bracket they found on Amazon. I liked the idea so much that I tried it. Here's a link. I used toggle bolts to attach the plate bracket to the grill. First though, I used black Rustoleum 'texture' to spay paint the bracket and bolts.
Gives them a very OEM look. Then I installed it. The thought of drilling into my new baby just pained me, this solution worked like a charm. Just finished up a mega road trip, hit speeds of 80, and the plate held. Here's a close up photo.